Hyperion Essbase Integration With Oracle Data Integrator (ODI)
By Praveen Reddy Atturi, HEXstream senior data analytics engineer
Loading Data and Metadata to Hyperion Essbase Application (Oracle SQL to Essbase Application)
Essbase is a multidimensional database that enables business users to analyze data from multiple perspectives and at a various level of consolidation. It maintains parent-child hierarchies and stores data in a multidimensional array format.
For Example, Time based hierarchies may include levels such as Minute → hour → Day → Week → Month → Quarter → Half Year → Year.
To begin working with Oracle Data Integrator (ODI), the first step is to launch the ODI studio application and connect to the repository. Follow these steps get started. Go to start à ODI and login to work repository.
1. Topology setup in ODI
After successfully logging into work repository go to the Topology Navigator select Physical Architecture Tab, Select Technology and expand it. GO to the Hyperion Essbase Right Click and select New Data Server. In the Definition tab enter the details of the server and provide the username and password.

Click on save it will ask you to create physical schema press OK.
In the Technology tab go to Hyperion Essbase expand it and select the newly created data server Right Click and Select New Physical Schema. In the definition tab enter the Essbase Application name and database name to which you want to connect.
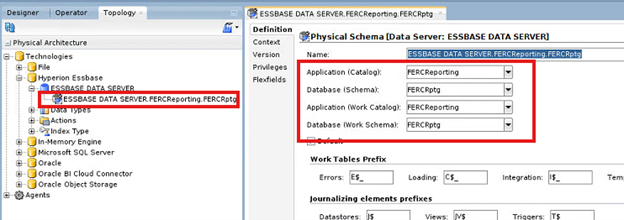
Click on save It will ask you to specify the context press OK.
Go to the Logical Architecture tab and expand technologies and select Hyperion Essbase. Right Click and select New Logical Schema.
Give Proper name to logical schema and set the Context to Hyperion Essbase physical schema.

Click on Save.
2. Import knowledge modules
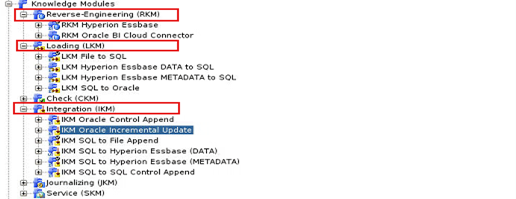
Expand Project go to knowledge module right click and import the below knowledge modules.
RKM Hyperion Essbase, LKM Hyperion Essbase Metadata to SQL, LKM Hyperion Essbase Data to SQL, IKM SQL to Essbase Metadata to SQL and IKM SQL to Essbase Data to SQL.
3. Reverse engineer
Now go to the model tab and create a new model folder. Now I will go to the newly created Model folder and create a new model. In the definition tab enter the name of the model and select the technology, select the logical schema, and save it.
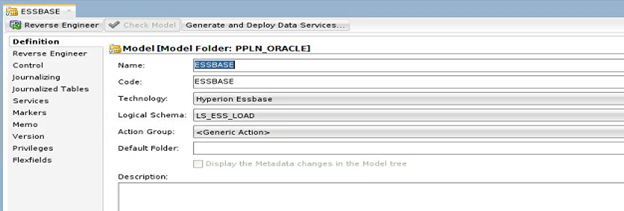
Then go to the Reverse engineer tab Select customize check box and select the Context, Logical Agent, and knowledge module. Click save.
Now newly created Model will be available for Reverse Engineering. Go to Model tab select Model and Right click and select Reverse engineer. Before Reverse Engineer the models make sure your agent services are running if they do not start it.

Now we can reverse engineering it. Click on the reverse engineer, select the context, Agent and log level, the click on OK.
Now Go to the Operator Tab to check whether the execution run successfully or not. If all the checks are green that means your model reverse engineered successfully. Now expand the Hyperion Essbase model, and you can check all the Dimensions are visible there from your Essbase Application.
4. Creating a project folder and developing ODI mappings
Now, Let’s create new project and within it, a create new mapping. Go to mappings section, right click and select New Mapping. Enter the suitable name for mapping.
Go to the mapping tab and drag the table from oracle data Model to source area and drag the Essbase model and drop it to target place.
Next Select the target object and select LKM & IKM.
· In the logical area, the LKM was set to select LKM SQL Multi-Connect.Global.
· IKM was set to IKM SQL to Hyperion Essbase (Metadata). — Loading Metadata to Hyperion Essbase Application
· IKM was set to IKM SQL to Hyperion Essbase (Data). — Loading data to Hyperion Essbase Application.
Rule File: Need to specify the name of the Rule File to be used for the Metadata load. This Rule File was created at the Essbase Application level.
Rule File separator: Rule separator specified in the rule file (Optional).
· Valid Values- Comma, Space, Tab and Custom characters (^, #, @).
LOG_FILE_NAME: If you want to see the logs showing how many records were successfully inserted or rejected, we need to create a specific path and specify that path in the log file name.
ERROR_LOG_FILE_NAME: If you want to view the error records and understand the root cause of the errors, you need to create an error.log file for that specific mapping in a designated path and provide that path in the ERROR_LOG_FILENAME parameter.
Ø IKM SQL to Hyperion Essbase (Metadata Load) for Essbase data load.

Ø IKM SQL to Hyperion Essbase (DATA) for Essbase data load.

Then, click on the save button.
5. Execution
Execute the newly created mapping. Then go to the operator navigator and check if the
execution is successful or not.
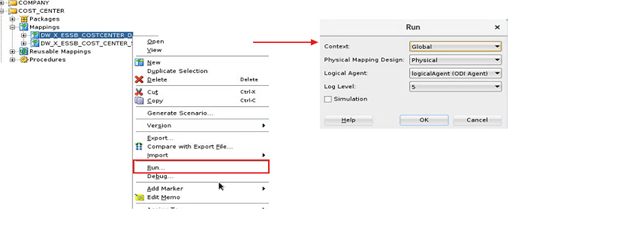
Then go to your target application and check the data load.
Loading data and metadata to Hyperion Essbase Application (flat file to Essbase Application)

I am going to be using the data server and physical schema I have set up previously connecting to the Database.
The first step to Create a model to hold the reversed Essbase database. If you already have an existing model, you can reuse it and perform the reverse engineering again.
Now, we can proceed with the Reverse engineering process. Click on Reverse Engineer. Select the appropriate context, Agent and Log level, then click on OK. Navigate to the
Operator tab to verify whether the execution was completed successfully or not. If all the indicators are green, it means the model has been reverse engineered in all the dimensions successfully. You can then expand the Hyperion Essbase model to view all the dimensions retrieved from your Essbase Application.

Now, a CSV file needs to be created, and reverse engineered. The file should be saved in the directory specified by the file technology configuration, in this case the system directory (C:\Oracle\Middleware\Oracle_ODI\Flatfile etc....)
A Datastore was then created using the Flat file model. To do this, navigate to the model
section and Create a New Model. Select Technology and logical schema. Then save the configuration.

Next, right click on the newly created model and select New datastore and enter desired the
name and alias, then click on resource name search field to locate and select the previously created CSV file, from here you get the created CSV file.

Then, navigate to the Files tab to specify the record separator either MS-Dos or Unix. Next, go to the 'File Format' section and choose the appropriate format (Delimited or fixed). Set the header row accordingly, and define the field separator (tab, space, comma or any other character as required). Then specify the text delimiter by setting it to a double quotation (").

The Datastore was then reverse engineered to generate the columns definitions based
on the structure of the Flat file.

So, that’s the source and target models creation done, time to create mappings.
Now, let’s create new project and within it, a create new mapping. Go to mappings section, right click and select New Mapping. Enter the suitable name for mapping. Go to the mapping tab and drag the Source file from Flat file Model to source area and drag the Essbase model and drop it to target place. Then map the columns between source and target. In the logical select the Target integration as Control append then, go to the physical tab and select the Target object and:
· In the logical area, the LKM was set to LKM file to SQL as we are loading to flat file (Source to Staging Area load).
· IKM was set to IKM SQL to Hyperion Essbase (Metadata). - Loading Metadata to
Hyperion Essbase Application
· IKM was set to IKM SQL to Hyperion Essbase (Data). - Loading data to Hyperion Essbase Application
Rule File: Need to specify the name of the Rule File to be used for the Metadata load. This Rule File was created at the Essbase Application level.
Rule File separator: Rule separator specified in the rule file (Optional).
· Valid Values- Comma, Space, Tab and Custom characters (^, #, @).
LOG_FILE_NAME: If you want to see the logs showing how many records were successfully inserted or rejected, we need to create a specific path and specify that path in the log file name.
ERROR_LOG_FILE_NAME: If you want to view the error records and understand the root cause of the errors, you need to create an error.log file for that specific mapping in a designated path and provide that path in the ERROR_LOG_FILENAME parameter.
Ø IKM SQL to Hyperion Essbase (Metadata Load) for Essbase data load.

Ø IKM SQL to Hyperion Essbase (Data Load) for Essbase data load.
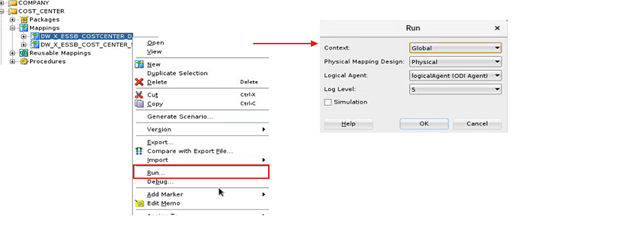
Click on the save button, Execute the newly created mapping. Then go to the operator navigator and check if the execution is successful or not. Finally, go to your target application and check the data load.
NEED HELP? CLICK HERE TO CONTACT US ABOUT STRATEGICALLY LOADING YOUR DATA.
